- If you are installing a new version of the iParts because of an iMIS upgrade, complete the upgrade first and make sure iMIS is running.
- If the existing iParts cause any problems with the upgrade, you can delete McGladrey.Library.dll and any other RSM-created dlls from Net\bin
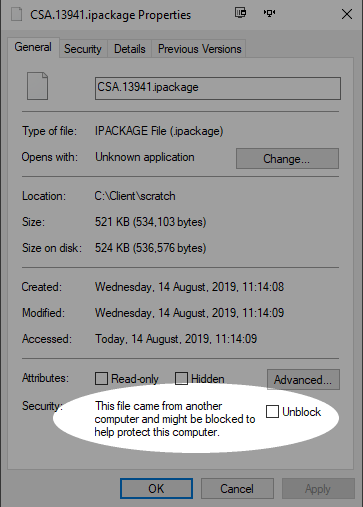
- Verify that the ipackage is not blocked by Windows. In Windows Explorer, right-click on the ipackage and choose Properties. If you see the highlighted section in this example
 , check the Unblock box and click OK.
 - Copy the ipackage file(s) to C:\Program Files (x86)\ASI\[yourimis]\Net\package\pending
- If you have never used Package Installer before, these folders may not exist. Opening Package Installer one time will create them, or you can create the folders by hand.
- (20.1.12 and previous) Stop the AsiPublishing service
- Log into the staff site as manager, and go to Tools > Package Installer
- Click Install.
- On iMIS 20.1.12 and earlier versions, you will receive a File Permissions error if you missed step 3.
- If the installation fails for other reasons, please report any errors to chadd (dot) arthur (at) rsmus (dot) com for support.
- You can retry a failed installation by moving the ipackage file from package\failed to package\pending.
- (20.1.12 and previous) Start the AsiPublishing service
- (20.1.13 and later) Copy McGladrey.Library.dll and other DLLs related to the package you are installing from ...\Net\bin to \AsiPlatform\asiScheduler_[instance]\bin and restart AsiScheduler by visiting its startup URL.
- Wait for iMIS to warm up again.
- Go to Tools > Manage Sitemaps. Publish the sitemap for each of these sites (ignore any that don't exist in your version of iMIS):
- iMIS Desktop View
- iMIS Web View
- Staff (also known as Admin)
- Advanced Accounting Console
- Go to Tools > Business object designer. Publish any business objects created by the install.
- Go to System Setup > RSM Configuration, add any license keys and review the other settings. Most settings do not need adjustment, especially during an upgrade.
- On an upgrade, you may need to edit and republish your iPart pages to incorporate new settings. Go to Content Management > Design Content, and then for each page with an RSM iPart:
- Click the Configure option on the first iPart.
- Review the configuration for new settings.
- Whether you made changes or not, click Save. (New options will be populated with appropriate defaults.)
- Repeat for each additional iPart.
- Finally, save the content page.
Additional information about Package Installer is in the iMIS documentation.